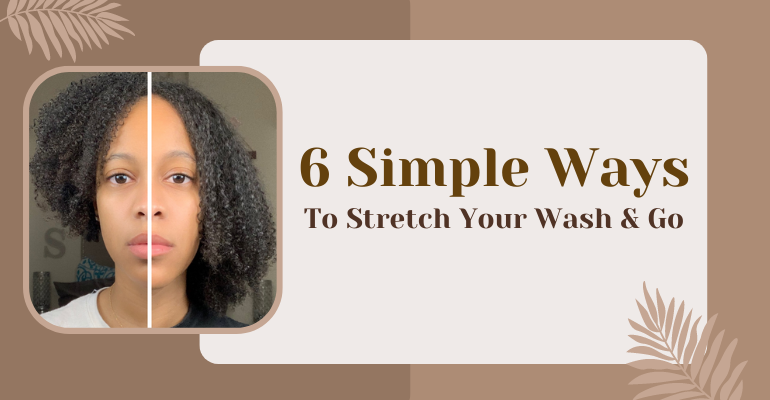
Let’s Talk About How To Stretch Your Wash and Go! If you have natural hair, you probably love the simplicity of a wash and go. It’s a go-to style for many naturals, but often, we’re looking for ways to combat shrinkage and enjoy more length (at least I know I do). That’s where natural hair stretching comes into play, giving your curls a longer, more elongated look without compromising the health of your curls.
The problem most of us naturals have with wash and gos is: SHRINKAGE! Shrinkage is a sign that your curls are healthy and well-moisturized, but it doesn’t show of the “true” length of our curls. And I know how anal we can be about the length of our hair. That’s why mastering curl elongation techniques can be a game-changer for your natural hair routine.
Luckily, there are several heatless hair stretching methods that can help you achieve a longer look in minutes. These techniques not only help in hair shrinkage solutions but also ensure that your curls stay healthy and defined.
Let’s get into this article! However, if you’d prefer to see a video tutorial on the techniques I use to stretch my natural hair, then CHECK OUT THE FULL VIDEO TUTORIAL BELOW.

Table of Contents
Stretch Your Wash and Go Technique #1: Banding Method
Banding is one of the most popular heatless methods (and one of my favorite methods) to stretch my wash and go. It’s one of the curl elongation techniques that doesn’t require heat, making it a safe option for your hair. It involves wrapping elastic bands around sections of your hair to elongate your curls. You can do this on wet or dry hair, and leave it for a few hours or overnight. The more bands you use, the more stretch you will get.
Here’s how to do the banding method:
- Start with clean and detangled hair. You can apply your favorite leave-in conditioner or moisturizer to hydrate your hair and prevent frizz. Then add your favorite gel, using the racking method, to make sure your strands are fully saturated. Make sure to let your hair dry, at least 90% of the way, before doing this method.
- Divide your hair into equal sections. The number of sections will depend on the thickness and length of your hair. You can do four, six, eight, or more sections.
- Take one section and wrap an elastic band around the base of it. Make sure the band is not too tight or too loose. You don’t want to cause tension or damage to your hair.
- Continue wrapping more bands along the length of the section, leaving some space between each band. The bands should be snug but not uncomfortable. Make sure to avoid placing the bands at the ends of your curls.
- Repeat the same process for the rest of the sections.
- Leave the bands on your hair for at least 4-5 hours or until your hair is completely dry. You can also sleep with them on, but make sure to cover your hair with a satin bonnet or scarf to protect your hair and the bands.
- After 4 hours (or when you wake up), gently remove the bands and fluff your hair with your fingers or a pick. You can also use some oil or serum to add shine and smoothness to your hair.

- Make sure that the moisturizer-gel combination that you use is compatible and doesn’t cause any flaking when dried. Here’s one of my favorite wash and go combos: Aussie Curl Leave-in Detangling and Wet-Line Gel. If you want to increase the shine and minimize the gel cast, add ELASTA QP Silk Liquid Styling Gel.
- For more stretched curls, create smaller sections when dividing hair.
- It’s best to do the banding method on dry hair. If you do this method on wet hair, the bands will leave creases or dents where they were placed.
The advantages of banding are:
- It gives you a lot of stretch and length.
- It is easy and inexpensive to do.
- It works on any curl type and length.
The disadvantages of banding are:
- It can take a long time to dry, if you do it on wet hair and especially if you have thick or long hair.
- It can cause breakage or snagging if you use the wrong type of bands or if you wrap them too tightly or too loosely.
- It can create creases or dents in your hair where the bands are placed.
I personally love banding because it gives me the best stretch and length without heat. I usually do it on dry hair and leave it overnight. I use about two-three bands per section, and I make sure they are not too tight or too loose. In the morning, I take them off and I have long and fluffy hair. I can style it however I want, or just leave it as it is. I love the banding method because it is a great way to show off my length and enjoy my wash and go for longer.
Banding Method Video Tutorial
Stretch Your Wash and Go Technique #2: Braid & Go
Now, you can do either a braid-and-go or a twist-and-go; however, I find braid-and-gos to be better option for stretching hair. If you want a twist option check out the next technique.
Braid-&-Gos are not just styling methods; they’re also effective curl elongation techniques for wash and gos. You can create smaller or larger braids on your dry or slightly damp hair. Then, you can gently unravel them and fluff your hair with your fingers or a pick. This will give you a defined and stretched wash and go. These two techniques are also styling methods that I use on my hair, even without a wash and go; CHECK OUT THIS ARTICLE ON HOW TO DO THE PERFECT BRAID-AND-GO AND TWIST-AND-GO.
Here’s how to do braid-and-gos:
- Start with clean and detangled hair. You can apply your favorite leave-in conditioner or moisturizer to hydrate your hair and prevent frizz. Then add your favorite gel, using the racking method, to make sure your strands are fully saturated. Make sure to let your hair dry, at least 90% of the way, before doing this method.
- Divide your hair into smaller or larger sections. The number and size of the sections will depend on the amount of definition and stretch you want. You can do six, eight, ten, or more sections.
- Take one section and braid it from the root, and down the length of the section, but avoid the ends. When you get to about three-fourths (3/4) of the way down the section, use a scrunch or elastic band to secure the braid, leaving the ends untouched. You can also use some gel or cream to define the curly ends, if needed.
- Repeat the same process for the rest of the sections.
- Leave the braid-and-go on your hair for 4-5 hours or until your hair is completely dry. You can also sleep with them on, but make sure to cover your hair with a satin bonnet or scarf to protect your hair.
- After 4 hours, remove the bands and gently unravel the braids and fluff your hair with your fingers or a pick. You can also use some oil or serum to add shine and smoothness to your hair.
The advantages of braid-and-gos are:
- They give you a lot of stretch.
- They don’t require heat.
- They work on any curl type and length.
The disadvantages of braid-and-gos are:
- They can create creases or dents in your hair where the bands are placed.
- They can create alternate curl patterns that do not match that of your wash and go curls.
- They can require more manipulation and maintenance than other methods.
I enjoy doing braid-and-gos when I want to have more definition and stretch in my hair. I usually do it on 90% damp hair and leave it overnight. I use about ten-twelve braids, and I make sure they are not too big or too small. In the morning, I take them off and I have defined and stretched curls. I can style them however I want, or just leave them as they are.
- This method requires a lot of hair manipulation, so I prefer to do this method on 90% dry hair instead of completely dry hair, because it helps minimize hair breakage and frizz.
- This method can create creases and a curl pattern that is different from your wash and go curl pattern. However, with some fluff and/or a bit of time out, it will disappear.
Braid-and-Go Video Tutorial
Stretch Your Wash and Go Technique #3: Flat Twists
Flat twists are an excellent method for stretching your wash and go and is a better variation of a twist-and-go. This technique not only provides a natural hair stretching effect but also contributes to no-heat curl definition, making it a perfect addition to your hair care routine.
Here’s how to incorporate flat twists into your regimen:
- Start with clean and detangled hair. You can apply your favorite leave-in conditioner or moisturizer to hydrate your hair and prevent frizz. Then add your favorite gel, using the racking method, to make sure your strands are fully saturated. Make sure to let your hair dry, at least 90% of the way, before doing this method.
- Part your hair into sections based on the desired size of your flat twists. Smaller sections will lead to more stretch, while larger sections will give less stretch.
- Separate your head in half, from ear to ear. Add a middle part to the front half and create twists from the middle part to your ear. Then create the flat twists from the crown of your head to the base of your head. If you’re new to parting, CHECK OUT THIS PARTING VIDEO FOR BEGINNERS.
- Starting from the roots, divide the first section into two strands and twist them around each other, adding more hair to each strand as you move along the scalp. This is similar to cornrowing but with two strands instead of three.
- When you get to about three-fourths down the length of your hair, secure the end of each twist with a hairband, leaving the ends of your hair loose.
- Allow your hair to dry completely. This could be overnight or a few hours, depending on your hair’s thickness and porosity.
- Once dry, gently unravel the twists. You’ll notice your hair has stretched, reducing shrinkage while still maintaining a defined pattern.
The advantages of flat twists are:
- They give you a good stretch.
- They don’t require heat.
- They work on any curl type and length.
The disadvantages of flat twists are:
- They can create creases or dents in your hair where the bands are placed.
- They can create alternate curl patterns that do not match that of your wash and go curls.
- They require the most manipulation out of all the techniques in this article
Flat twists are not only a great way to stretch your hair, but they also serve as a protective style that can last for several days. By keeping your hair stretched and in place, flat twists minimize knots and tangles, making them an ideal hair shrinkage solution.
- This method requires more hair manipulation than a braid and go, so I prefer to do this method on 80% dry hair instead of completely dry hair, because it helps minimize hair breakage and frizz.
- This method can create creases and a curl pattern that is different from your wash and go curl pattern. However, with some fluff and/or a bit of time out, it will disappear.
Flat Twist Video Tutorial
Stretch Your Wash and Go Technique #4: Pineapple Bun
The pineapple bun method is a simple and quick curl preserving technique that can also stretch your hair. You just need to gather your hair into a high ponytail and secure it with a scrunchie or a clip. You can do this before going to bed or for a short time during the day.
Here’s how to do pineapple method:
- Start with clean and detangled hair. You can apply your favorite leave-in conditioner or moisturizer to hydrate your hair and prevent frizz. Then add your favorite gel, using the racking method, to make sure your strands are fully saturated. Make sure to let your hair dry, at least 90% of the way, before doing this method.
- Gather your hair into a high ponytail and secure it with a scrunchie, making sure to keep the curly ends out of the bun. Make sure the ponytail is not too tight or too loose. You don’t want to cause tension or damage to your hair.
- Leave the pineapple on your hair for as long as you want. You can also sleep with it on, but make sure to cover your hair with a satin bonnet or scarf to protect your hair and the pineapple.
- When you are ready, remove the scrunchie and fluff your hair with your fingers or a pick. You can also use some oil or serum to add shine and smoothness to your hair.
- This method can cause and uneven stretch, where the hair at the back of your head is stretched more or longer than the rest of your head. You can minimize that by placing the bun on the crown of your head instead of the top of your head.
The advantages of pineapple are:
- It gives you a lot of root stretch and volume.
- It is very easy and convenient to do.
- It works on any curl type and length.
The disadvantages of pineapple are:
- It may not give you much stretch on the ends of your hair.
- It may create an uneven stretch.
- It may create creases or dents in your hair where the scrunchie is placed.
I often do pineapple when I am tired and want a quick and easy way to stretch my hair over night. This is my #1 lazy girl hair stretching technique. I usually do it on dry hair and leave it overnight. I use a large scrunchie and a satin bonnet to protect my hair. In the morning, I take them off and I have stretched and voluminous hair. I can refresh my curls with some water and product, or just leave them as they are. The pineapple bun is a quick and easy way to stretch your roots and prevent shrinkage.
Stretch Your Wash and Go Technique #5: Buns or Mini Pineapple Buns
Buns are another simple and effective method for heatless hair stretching of your wash and go. It’s a simple technique that also serves as one of my hair shrinkage solutions when I’m tired and want to go to bed. You can divide your hair into two or more sections, twist them (this is optional), and secure them into buns. This will create stretched curls and add volume to your hair. I recommend doing this on dry hair instead of wet or damp hair.
Here’s how to do buns:
- Start with clean and detangled hair. You can apply your favorite leave-in conditioner or moisturizer to hydrate your hair and prevent frizz. Then add your favorite gel, using the racking method, to make sure your strands are fully saturated. Make sure to let your hair dry, at least 90% of the way, before doing this method.
- Divide your hair into two or more sections. The number of sections will depend on the amount of stretch and volume you want. You can do two, four, six, or more sections. I typically do four sections.
- Take one section and twist it from the root, all the way down the length of your hair, but make sure to avoid the ends. You can also use some gel or cream to define your twist and hold it in place.
- Wrap the twist around itself to form a bun. Secure it with a bobby pin or a scrunchie, making sure to leave your curly ends exposed. Make sure the bun is not too tight or too loose. You don’t want to cause tension or damage to your hair.
- Repeat the same process for the rest of the sections.
- Leave the buns on your hair until your hair for 4-5 hours or until your hair is completely dry. You can also sleep with them on, but make sure to cover your hair with a satin bonnet or scarf to protect your hair and the buns. I prefer doing this overnight for a more stretched look.
- After 4 hours, gently unravel the buns and fluff your hair with your fingers or a pick. You can also use some oil or serum to add shine and smoothness to your hair.
- Think about this method as mini pineapple buns. You do not have to twist your hair before creating the bun, twisting will give you a better stretch, but it’s not necessary. This is my second GO-TO, lazy hair stretching method. Creating four mini pineapple buns is not quicker, but it gives me a better stretch than one big pineapple bun.
- Don’t forget to keep your curly ends exposed. Exposing, your ends protects your coils and avoids the look of semi-blown out and crusty looking ends. It just isn’t cute y’all!!
The advantages of buns are:
- They give you a nice wave and volume.
- They are quick and easy to do.
- They work on any curl type and length.
The disadvantages of buns are:
- They may not give you as much stretch as other methods.
- They may cause frizz or flyaways if you don’t use enough product or if you unravel them too roughly.
- They may create creases or dents in your hair where the buns are placed.
I like doing buns when I’m lazy and don’t mind a bit of volume and frizz to my curls. I usually do it on dry hair and leave it overnight. I use about four buns, and I make sure they are not too big or too small. When I take them off, I usually get a decent stretch, not as much as the banding method, but still a good stretch with some fluff. I can wear it down or up, or add some accessories to spice it up.
Mini Buns Video Tutorial
Stretch Your Wash and Go Technique #6: Tension Method
The tension method is my favorite (and in my opinion, the BEST overall) way to stretch my wash and go. Now, this one requires heat, so using a heat protectant is a requirement. It’s a quick fix for those days when I want a longer look right away and don’t want to wait overnight to see the results; making it a key technique in my wash and go tips and tricks. This is also a method that I use when doing my silkpress; CHECK OUT THIS ARTICLE FOR MY SILK PRESS TUTORIAL.
It involves using a blow dryer with a concentrator nozzle and gently pulling the hair taut with your fingers while moving the nozzle down the hair shaft until it is dry. This method can be done on wet, damp, or dry hair, and it can provide an excellent amount of stretch and smoothness.
Here’s how to do the tension method:
- Start with clean and detangled hair. You can apply your favorite leave-in conditioner or moisturizer to hydrate your hair and prevent frizz. Then add your favorite gel, using the racking method, to make sure your strands are fully saturated.
- Divide your hair into smaller or larger sections. The number and size of the sections will depend on the amount of stretch you want and speed in which you want your hair stretched . You can do four, six, eight, or more sections.
- Apply your favorite heat protectant to your hair. CHECK OUT THIS ARTICLE ON A DIY HEAT PROTECTANT.
- Take one section and hold it between your fingers near the ends. Make sure the section is not too thick or too thin. You don’t want to cause uneven drying or overheating to your hair.
- Attach the concentrator nozzle and turn on your blow dryer. Set the blow dryer to a low or medium heat and high speed setting. You can use a higher heat if you want, but be careful not to damage your hair.
- Move the blow dryer along the length of the section, from the root to the length of your hair (make sure to avoid the ends of your hair), while gently pulling the hair taut with your fingers. Keep the blow dryer a few inches away from your hair and avoid staying in one spot for too long. The downward motion and the tension will help stretch your hair.
- Repeat the same process for the rest of the sections.
- When your hair is dry, fluff your hair with your fingers or a pick. You can also use some oil or serum to add shine and smoothness to your hair.
- If you’re against using heat on your hair or don’t plan on using a heat protectant, I would suggest you use low heat and high speed setting on your blow dryer. It will take longer for your hair to dry, but your hair will be protected from any possible heat damage.
- AGAIN, please AVOID stretching the ends of your hair because that blown-out wanna-be curl look really ain’t cute!
The advantages of the tension method are:
- It gives you a lot of stretch and smoothness.
- It is the fastest of the five methods (you can get stretched look in an hour or less)
- It works on any curl type and length.
The disadvantages of the tension method are:
- It can cause damage to your hair if you use too much heat or if you don’t use a heat protectant.
- It can cause frizz or flyaways if you don’t use enough product or if you move the blow dryer too fast or too slow.
- It can create a blown out look if you place too much tension on your hair
I usually choose the tension method when I want to have more stretch in my hair. I usually do it on wet hair and use a high heat and high speed setting. I feel comfortable doing that because I always use a heat protectant when using heat on my hair.
I use four sections and then divide them in smaller sections as I go, making sure they are not too big or too small. I move the blow dryer slowly and gently along the length of my hair, while pulling it taut with my fingers. When I’m done, I have stretched and smooth hair. I can style it however I want, or just leave it as it is. The tension method is a fast and easy way to stretch your wash and go.
Tension Method Video Tutorial
Conclusion
As you can see, there are many ways to stretch your wash and go on natural hair with and without using heat. These methods are easy and effective, and they will give you more length, volume, and versatility.
Here are some tips on how to maintain the stretch and how to style your hair after stretching:
- To keep your hair stretched for longer, you can re-do the method of your choice every night or as needed, or you can alternate methods. You can also use a satin bonnet or scarf to protect your hair at night and prevent shrinkage.
- To style your hair after stretching, you can use your fingers or a pick to fluff and shape your hair. You can also use some accessories like clips, headbands, or scarves to add some flair to your look. You can also try some updos, half-updos, or ponytails to show off your length and volume.
- To keep your hair healthy and moisturized, you can use some oil or serum to seal in the moisture and add shine and smoothness to your hair. You can also deep condition your hair once a week or as needed to nourish and repair your hair.
- Don’t be afraid to refresh your wash and go when needed. CHECK OUT THIS ARTICLE ON HOW I REFRESH MY CURLS!
I hope you enjoyed this article and learned something new. Thank you for reading and please feel free to comment or ask questions below. I would love to hear from you and see your results. Happy Hair Stretching!
Stretch Wash & Go and Avoid Shrinkage Full Video Tutorial
